Seth's House
DIY 12 Volt PID Smoker Controller
While my last PID controller build is extremely versatile and a multi-tasker, the only drawback is that it requires AC power to operate. I recently put together an Ugly Drum Smoker, which unlike my CharGriller, is (somewhat) portable. The need came up for me to build a PID + blower fan rig that could be powered from AC, but also portable power if necessary. Luckily for me, the JLD612 comes in a 12 volt model, and with a background in car electronics, this 12-volt setup was a cake walk. This particular build is not a multi-tasker, just a straight up smoker controller.
While at home, I can power it with a standard 12 volt wall wart power supply, and when on the go, I can use a jump pack, or even a car battery and some alligator clips.
Just like anything I post, this is the way *I* built this unit. Is it the only way to do it? Nope. Is it the absolute best? Probably not. But it works for me, and should give you, the reader, enough information to help you figure out something on your own.

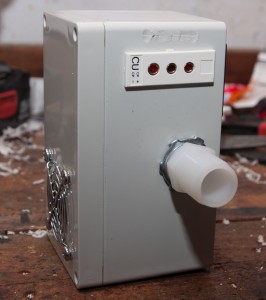
Completed unit
Parts List
Here are the parts I used for my build – many have “See Power Input Notes below” because you can pick and choose whatever type of physical input power connector you wish.. this is just what I ended up with myself. There are infinite choices, many better ones than I have used, you’re free to do what you wish.
- 1x JLD-612 (12 Volt Model) PID Temperature Controller – $36.50 US
- 1x Digikey P/N 603-1177-ND 15.3CFM 12V Blower Fan – $15.53 US
- 1x Digikey P/N HM923-ND Project Box – $15.13 US
- (See Power Input Notes below) 1x Digikey P/N T1061-P5P-ND 12volt Power Supply – Size M Connector- $14.70 US
- 1x PT100 Sensor Probe – $15.50 US
- 1x TPJ-U-F thermocouple panel jack – $4.70 US
- 1x OTP-U-M thermocouple male plug – $3.90 US
- (See Power Input Notes below) 1x Digikey P/N SC-1047-ND *OR* Radio Shack 274-1563 Size ‘M’ Panel Connector ~$4 US
- (See Power Input Notes Below) 1x DigiKey P/N 763KSW-ND *OR* Radio Shack 274-1569 Size ‘M’ DC Power Plug ~$4 US
- (See Power Input Notes Below) 1x 12 Volt SPST Switch (optional – have a look at Digikey’s catalog or a Radio Shack Example that I used) ~$4 US
- Standard Automotive 12 volt relay (something like this) – ~$5 US at any Auto Parts store, I had some laying around
- (Optional) 2x Barrier strips, at least 3 positions – like these – don’t forget the jumpers
- 1″ ID x 3/4″ MIP Nylon Hose Barb (Home Depot part A-625 in the nylon hose part area)
- Hose to connect to your smoker – I used 1″ ID plastic bilge hose from Home Depot
- (Optional) 1x Warning light, 12volt powered, if you plan on using the built in alarm functions of the JLD612
- 1x Fan guard, salvaged from parts laying around. Digikey’s fan guard section
- 1x Fuse holder Example 1 Example 2 – along with a 1amp 12 volt fuse
- M4 nuts and bolts to mount the fan
- Various quick disconnect crimp connectors. If you have a well stocked electrical connector box for automotive stuff, that will get you through it
- Hot glue gun to mount components like the barrier strips
- Dremel tool / drill, to mount everything in the box
Power Input Notes
I chose to use a wall wart for my 12 volt power source (when AC is available), and also put an on/off switch for the whole unit. You don’t need to use either, but you can if you want. I actually bought the wall wart, but, if you go digging in your junk pile at your residence, you will probably find a 12V power supply that works just fine for you from an old phone or router. You may also decide to use this away from any type of power source ever, and just use a 12 Volt battery or jump starting pack (my whole reason for building a 12 volt PID in the first place) – in that case, pick whatever type of physical power input plug works for you. Digikey and Radio Shack have extensive choices, have fun with their catalogs.
Relay Talk
The JLD612 has two different methods of activating the heating device, in our case, a blower fan. It can use the built-in relay J2, or it can use the built in SSR (solid state relay) control. Since I had relays laying around, my build uses the J2 option. If you want to use an SSR, by all means, go right ahead. Sample units are here and here. The advantage of using an SSR is that you could use the built in alarm functions of the JLD612 to activate warning lights (anything, really) on low or high temperature conditions, while using the SSR output for the PID control. In my setup, J2 is tied up with PID control, so only J1 is available for alarm output.
Fan Output – Rectangle in to a round hole?
When I first envisioned this thing, my only real question without having the parts in my hand was if the rectangular output of the fan would mate up to the circular hose barb – more importantly, if I would have to block off the air from the fan exit so that it would only blow out of the hose barb, and not just blow inside the project box. The answer is, no, I did not have to block off any of the fan exit. When I mounted everything, I lined it up as best I could, and plenty of air comes out of the barb without any sort of special ductwork. I am actually impressed at the amount of air that this fan moves.
Component Mounting
I mounted the JLD612 and thermocouple jack first. Make templates with cardboard for the JLD612 and thermocouple panel jack. Transfer these templates to the plastic project box and start cutting. My JLD612 is mounted high on the box as far as I can go, while still being able to attach the wire terminals for pins 6-10 on the JLD612, and leaves enough space for the fan to fit in the box.
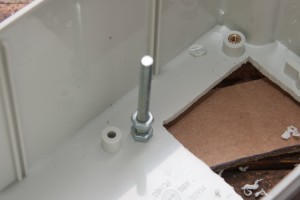
Closeup of fan mounting post
Once the JLD612 is in place, I worked on mounting the hose barb, which is the fan output. I first placed the fan in the box and mounted it as high as I could without interfering with the JLD612, but also clearing the plastic ridge inside the box. I then marked its two mounting holes and drilled holes in the plastic box. Using a 2″ M4 machine screw, I secured the screw through the box, with a nut on the inside. I then added 1 nut to each screw, so the fan stood off of the box by about a 1/4″ (eyeballed). Once the fan was mounted, I marked the center location of the fan output, and drilled the hole for the hose barb. Mount the hose barb with the conduit nuts, then adjust the location of the fan so that it is centered in the host barb opening. Once it’s centered, add another nut to each screw to hold the fan securely.
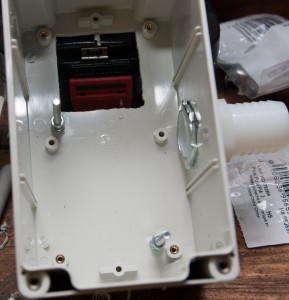
Mounting hole for JLD612. Posts for the fan, and barb mounted.
The switch, warning light, and power input jack all mount through drilled holes. The relay inside mounts on one of the fan screw posts with a nut, just so it’s not bouncing around.
Wiring
- Input voltage comes in through the M connector. Negative (aka ground in the 12V world) goes straight to the Negative Barrier Strip. +12v goes through the switch, to the fuse holder, then to the +12V Barrier Strip.
- Supply +12V from barrier strip to the JLD612 on pins 1, 4*, 13, and the relay pin 30
- Supply -12V from barrier strip to the JLD612 pin 2, Relay pin 85, fan negative, warning light negative*, and your switch if you chose a lighted one
- Connect the red pin of your thermocouple to pin 8 of the JLD612 (through panel jack)
- Connect each blue pin of your thermocouple to pin 9 and 10 of the JLD612 (through panel jack)
- Connect pin 14 of the JLD612 to pin 86 of the relay
- Connect pin 87 of the relay to the fan positive input
- Connect pin 5 of the JLD612 to your warning light +12v*
*Warning light not pictured at the time of writing this
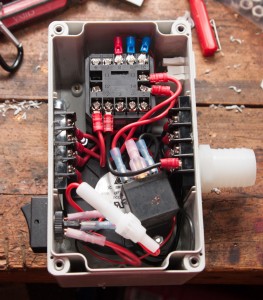
Everything mounted and wired
That’s about it as far as construction goes! You will want to familiarize yourself with the PID controller manual and set all of the configuration parameters properly on the first use. My settings are as follows on the ‘0089’ set menu:
- IntY = PT 10 0 (Pt100 thermocouple, this setting will show temp in .1 increments)
- OutY = 1 (PID controls J2 )
- rd = 0 (heating control)
- CorF = 1 (Fahrenheit)
On the ‘0001’ set menu, I have the following settings, for the high temperature warning light to come on at 230F and go out at 228F:
- AH1 = 230
- AL1 = 228
On the ‘0036’ set menu, I have the following setting due to me using a mechanical relay. For an SSR, leave this alone:
- ot = 5 (Recommended to use 5-15, TBD what setting I end up with. This keeps the relay from cycling so much and wearing out)

Maiden voyage, on the UDS
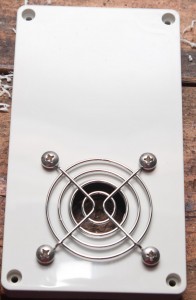
Fan finger screen
Side view, thermocouple plug and hose barb. Don’t mind my dremel oops.
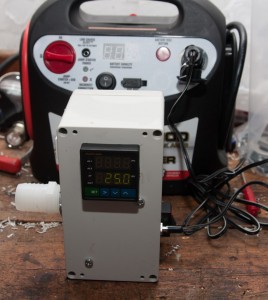
Tested the controller out with a cigarette lighter plug.. works great off a jump pack

Ugly Drum Smoker (UDS) Build
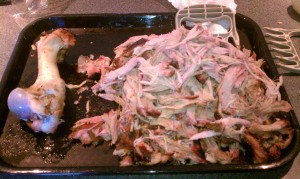
First pork butts out of the UDS
While my CharGriller Smokin’ Pro has done me right over the years, I wanted to build another smoker with more capacity. Originally, I was going to build an offset smoker with a 55 gallon drum. Once I started researching that, I came across plans for an Ugly Drum Smoker, and after a ton of reading, decided to go that route.
My plans were based off all of the reading in the BBQ-Brethern.com thread, as well as the plans from this site. All the credit goes to them.. I didn’t invent anything, I just did a lot of reading and followed recommendations.
Upon setting out, I knew I wanted two things out of this.
- Two cooking grates (twice the cooking area 🙂 ). That means I had to use a dome lid
- PID control -done, see here
For #1, many folks take the lid off of a Weber 22.5″ grill, which fits directly on a 55 gallon drum without any modification. I wasn’t about to drop a bunch of coin just to get a lid, and I don’t need another grill, so I found an alternative. This Uniflame 22.5″ Grill from Walmart has a lid that will fit a 55 gallon drum with a tiny modification – see Thread 1 or Thread 2. Bonus – the grill was on clearance at Walmart, I picked a few of them up for $20 a piece.
The Build
I have friends in the auto industry, and they in turn have access to 55 gallon drums. My cost on the drum was 0, but you can find them in the Philly area quite easily for about $25 if you look on Craigslist.
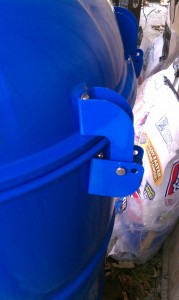
I also have friends with a Powdercoating business, so I was able to get a quality powdercoating job on the entire outside of the drum done in a nice, bright blue, without breaking the bank. I could have painted the drum like most people, but the powdercoating came out AWESOME and it will last for years to come.
Check out Precision Powdercoating, that’s where I had the drum done. Tell them I sent you!
Anyways ..
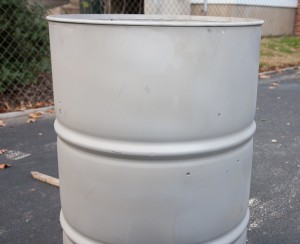
First I had the drum completely sandblasted. This is also a requirement before powdercoating, so I probably did not need to get this done twice. In the following pictures, the gray color is the bare metal of the drum after sandblasting.
First step before painting or powdercoating is to make all of the necessary holes and modifications to the drum.
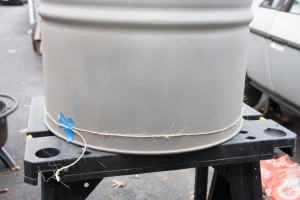
Marking the 3 air inlet holes
I tied a string around the drum, took it off, marked it off in thirds, transferred the marks to the drum and drilled.
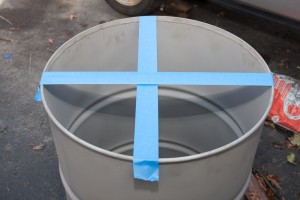
I used tape to mark center lines across the top of the drum.
Once I had even marks around, I made my holes for mounting the grate holder bolts, thermometer, handles, and thermocouple.
Mounting holes for various items
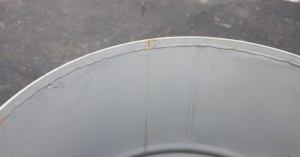
The inside rim of the drum was rough, from removal of the original top (the drum was sealed)

Took the angle grinder to smooth out the inside lip
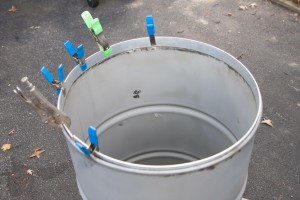
To make the Uniflame lid fit snugly, I took some 1/8″ thick 1 1/2″ aluminum flat bar, bent it around the inside of the lip, then riveted it into place.
Start at one end, place rivets about every 6 inches. Trim the flat bar once you are at the very end (and don’t cut it too short like I did, otherwise you have to fill a gap)
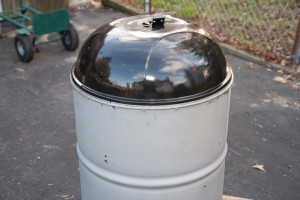
Dome fits snug now!
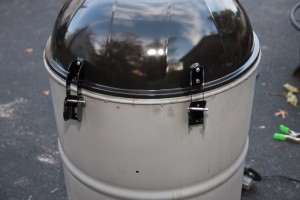
I used the hinge hardware that came with the Uniflame grill, and attached it to the UDS.
The only modifications to the hinges that were necessary was to make new holes for the pins to go through .. easy work with a drill.
Modified hinge mechanism
Once all of the holes were done, I disassembled everything and sent the drum out for powdercoat (outside of the drum only!). Once it came back, I mounted all of the hardware up, using stainless hardware. To seal the drum well, you should use high temp RTV around each and every fastener from the inside of the drum (yes, it is food safe). I didn’t do this step, and I had a ton of oil leak out of each and every fastener hole, staining my fresh powdercoat job 🙁 Seal the aluminum lip for the lid, from the bottom of the lip inside the drum, to keep air from leaking out. I used a flashlight place inside the drum, facing up at my face, to see the air gaps and make sure I sealed it properly.
For the charcoal basket, I used the charcoal grate from the Uniflame grill, and expanded steel. I bent the expanded steel around a propane tank to get the basic shape, then welded it to the grate and itself, forming a cylinder. I then took a cheap $5 aluminum pizza pan from Walmart to use as an ash pan, using stainless 3″ bolts to offset it from the rest of the basket.
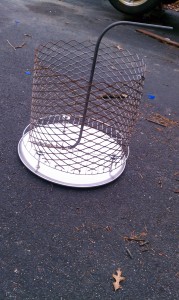
Here’s the charcoal basket. I scrapped the original handle idea and just put a bar across the top.
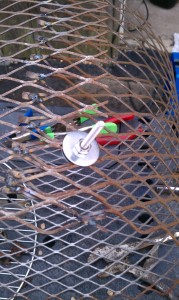
Used nuts and bolts to hold the steel together while I welded it. (p.s. my welding skills suck, I know!)
That’s about it! Along with my 12v PID controller, the UDS has proven to be quite awesome!
More pics:
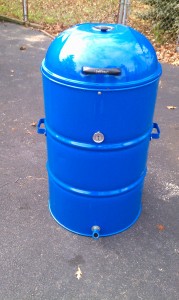
Assembly complete, ready to go
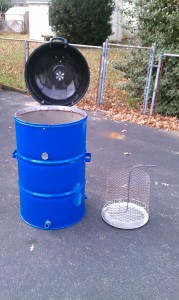
UDS and basket

Seal your holes well.. or you get THIS!
DIY PID Control for BBQ, Sous Vide, Mash Tun, whatever….

My DIY PID Controller for BBQ, Sous Vide, Home Brew
(update: go HERE for a 12 volt BBQ controller!)
I’ve been slacking on the blog, I know, been busy!
Here’s a project that’s been in the works for a while, and I wanted to test it out to make sure it works well before sharing with everyone.. well, here it is! A DIY PID controller for a smoker, sous vide cooking, mash tun, whatever you can think of, that doesn’t break the bank. After a few runs in the smoker and sous vide (a la crockpot), I can say, it’s awesome !!!!
What is PID? Basically you tell it what temperature you want something, and it figures out how to hold that temperature. It’s nerdy and involves lots of math. I can’t explain it too well, so go and read about it here.

PID Controller, Sous Vide style, powering a crockpot
When I set out to build this, I wanted to keep costs down (obviously), but I wanted it to be versatile, so I decided to build everything with modular plugs, so that thermocouples and outputs could be swapped in a matter of seconds. Everything fits into a project box, and all you do is plug in power (input), a thermocouple (thermometer for you noobs), and then plug in an output device, whether it is a blower fan, a crock pot, a heating element, whatever. All of the components in my design are good for 15 amps, so a ~1500 watt heating element should be no issue. Wiring is simple and contained completely within the project box. I chose to do a simple design for the first incarnation of this device, but I have some ideas for another one. The PID controller has alarm outputs (such as over/under temperature) that could potentially control other items, such as a damper to release extra heat in the smoker, outputs to my X10 devices to page me, etc… the possibilities are endless.
Parts List
- 1x JLD612 PID Controller – $33.50 US
- 1x Submersible thermocouple – $19.50 US – this is for Sous Vide only
- 1x PT100 thermocouple – $16.50 US – this is mounted in my smoker
- 1x ESSR-25DAC 25amp DC in / AC Out Solid State Relay (SSR)- $8.95 US
- 1x EHS-SSR25A heat sink for the SSR – $4.25 US
- 1x TPJ-U-F thermocouple panel jack – $4.50 US
- 2x OTP-U-M thermocouple male plug – $3.50 US each (only need one per thermocouple
- 1x 486-1083-ND – female NEMA-15 outlet (output outlet) – $1.42 US
- 1x CCM1909-ND – power entry module w/ switch (input) – $7.66 US (you can go with a more simple input plug without a switch, but I wanted a switch on mine, and these fit your standard computer power wires)
- 1x HM928-ND project box – $17.82 US – Digikey’s site is very easy to search, if you need a bigger box, then look around – just make sure the dimensions are deep enough for all of your components.
- 1x 1053-1118-ND 14CFM blower fan – you can go bigger or smaller, this one seems to work great on my Chargriller
- 2x Barrier strips, at least 3 positions – like these – don’t forget the jumpers
- 1x stainless steel pet water bowl, to mount the fan to the BBQ – see picture. Found it at Walmart for a few bucks
- Various M4 screws, to mount SSR heatsink to the SSR. Take them both with you to Lowe’s/Home Depot and figure it out
- Heat sink paste for the SSR
- Various quick disconnect crimp connectors. If you have a well stocked electrical connector box for automotive stuff, that will get you through it
- Hot glue gun to mount components like the barrier strips
- Dremel tool / drill, to mount everything in the box
Wiring
Wiring is pretty easy – you can see most of it in the picture. Use at least 14ga on the 120volt stuff. The DC is low current, but I still used 16gauge because that’s what I had around. Thermocouple wiring comes with the thermocouples, I just changed the connectors. Specific wiring info:
- For 120v – the hot side of the input module goes through the switch and feeds a barrier strip. One barrier strip output goes to the output side of the SSR, the other output goes to the PID controller on pin #1. SSR Output goes to the output module hot.
- The neutral side of the input module feeds a barrier strip. One barrier strip output goes to the neutral of the output module, the other goes to the PID controller on pin #2.
- The ground wire goes directly from the input module ground, to the output module ground.
- The thermocouple panel has one plug that is larger – I used that for the red. Connect that to pin #8 on the PID. Connect the two blues to pins #9 and #10
- Connect Pin #6 of the PID to the + Input of the SSR
- Connect Pin #7 of the PID to the – Input of the SSR

PID Controller, wired up in the project box
Component Mounting
Mounting components was simple. The input module, output module, PID controller, and thermocouple plug all require some dremel work to make mounting holes, then they snap into place. I used some hot glue for added security. My input is on the right in the picture above, the output and thermocouple is on the left.
The heatsink mounts to the project box with screws, those are the 2 screws that you see on the first picture of this post that show through the front. I did not want to use glue for this part, as this part gets hot, I don’t need it coming loose inside.
When mounting the Thermocouple in your smoker, you want it as close to the cooking surface as possible, and also nearest to any potential hotspot. Remember, with smoking, high temperature is bad and will ruin food, low temperature only extends cooking times. On my Chargriller Smokin’ Pro, this meant the thermocouple was mounted about an inch off of the cooking surface, on the right side of the cooking area, nearest to the side fire box. My smoker can vary temperatures up to 15 degrees from side to side.
That’s about it as far as construction goes! You will want to familiarize yourself with the PID controller manual and set all of the configuration parameters properly on the first use. My settings are:
- IntY = PT 10 0 (Pt100 thermocouple, this setting will show temp in .1 increments)
- OutY = 2 (PID controls SSR )
- rd = 0 (heating control)
- CorF = 1 (Fahrenheit)

Blower fan, mounted on the side firebox of a Chargriller Smokin’ Pro

Here’s a brisket that was done using this controller

Teriyaki Chicken Breast, Sous vide
Some more pictures of the box:

Another wiring view

Thermocouple port and output port

Input module, accepts standard computer power supply plug

Thermocouple mounted on the smoker (since moved to the other side)
DIY Pastrami
I’m a fat Jewish guy – of course I love Pastrami. Normally I enjoy it over at Harold’s Deli, but Lee and myself got some good deals on corned beefs at the restaurant depot (I’m talking sub $2 a pound). These things were bohemoths, the smallest ones we could find weighed in at 15 pounds.
Besides boiling to make some delicious corned beef, I decided to throw part of one in the smoker and make some Pastrami. It’s pretty routine as far as bbq goes.. rub, smoke, slice, and eat!
Because I bought a corned beef already in the brine (you can go ahead and work for weeks to do your own, have fun with that), and there is salt in the rub, I want to get some of the salt out of the meat before cooking. Put the corned beef brisket in a big pot of water and let it soak in the fridge for 4-6 hours before smoking, changing the water out a few times. This will get a good bit of the salt out of the solution.
The rub consists of:
- 1/4 cup salt
- 1/4 cup paprika
- 3 tablespoons coriander seed
- 3 tablespoons brown sugar
- 2 tablespoons whole black peppercorn
- 2 tablespoons mustard seed
- 8 cloves minced garlic
Finely grind the seeds and peppercorns in a spice grinder. Take the brisket out of the pool of water and dry it (if you went this route), then combine all of the ingredients above and rub the brisket nice and good.

Pastrami, out of the smoker and rested
Place it in a 225 degree smoker, but don’t do a heavy smoke like you would a pork butt or bbq brisket – you want a light smoke for pastrami. I went with hickory and apple, light amounts at a time. You can t ake the pastrami off of the smoker when it reaches 165 degrees, and place in a tin foil tent and let rest for 20 minutes, then slice against the grain. The end temperature is a big subject of debate on the Internet, it seems. For BBQ brisket, I’d let it go to 185. I took this Pastrami off at 165, I will probably let it go to 175 next time to see the difference. It wasn’t bad at all, don’t get me wrong, but I think the extra 10 degrees would help with tenderness.

Pastrami sliced up. Sorry for the crappy pictures, I forgot to take a picture with a real camera before I ate it all.
Smoked Brisket – can’t fake a good thing

Mmmmm... gotta love it
Brisket is not the fanciest cut of meat, but it’s dirt cheap, and if you cook it low and slow in the smoker, it’s some of the tastiest eats you can create. This is my take on BBQ Brisket, just about everyone you talk to will do it differently. As long as you keep your temps down, there’s really no wrong way about it.
You will need:
- Brisket. The bigger the better. The one here was 11.84 lbs, untrimmed. You’ll be cooking all day, might as well cook as much as you can.
- BBQ Rub. More on this below.
- Smoker, along with wood. I prefer logs but all I had was chunks. I do Hickory and any fruit / nut wood, today was Hickory, Pecan, Apple, Cherry
- Good appetite after cooking all day
BBQ rub is another thing that varies amongst any cook you will ask. I don’t really remember what is in mine, I make a big batch and keep it in a mason jar until I run out, then I make it again. I can tell you that for the most part it is 8 parts brown sugar, 2-3 parts salt, 1 part everything else, 1/2 part peppers (i.e. cayenne, black). The everything else can be onion powder, garlic powder, cumin, paprika, garam masala, ground mustard, ground coriander, celery seed, ginger, chili powder, use your imagination – just hit the spice cabinet and start mixing, it’s really hard to go wrong. Paprika and Cayenne will up the heat, so watch it if you are cooking for a bunch of wusses.

Untrimmed Brisket, straight out of the pack
- 12-24 hours in advance, pull the brisket out of the fridge and it’s time to trim it up. Looking at the picture above, the top right of the picture is called the “cap” or the “point.” This is some fatty goodness, don’t cut it off (more on this later).
- I get my brisket at the restaurant supply so there is some work to do, YMMV. Basically, I trim off the solid chunks of fat and leave a small coating across the whole thing. Fat = deliciousness in the long run, and most of it will drip away and baste the meat during cooking, so you will not want to leave on the solid 1-2″ bands of fat. Trim them off, you don’t have to be precise, I surely wasn’t as you can tell in this picture:

Trimmed Up Brisket - doesn't have to be perfect (this is far from it)
- Lay on the rub. Be generous, and coat everything on all faces.

Rubbed up Brisket
- If you are a retard and think you won’ t remember which way the grain goes after cooking, make a notch in one corner so you know which way to slice it when it is done
- Once the brisket is rubbed up, seal it up well with foil and put back in the fridge. Make sure it’s sealed good, and place it on a tray or baking sheet before placing in the fridge, otherwise you will end up with raw meat BBQ goo dripping all over the place.
Time to cook
Cooking this thing will take you 8-12 hours, with close attention required until you get your temperatures stable and less attention required throughout the day. Figure about 1 hour per 1-1.5 lbs of brisket. Plan accordingly along with laundry day, house work, home work, etc.. Unless you have one of fancy smokers that you can set the temperature and not feed it wood all day, don’t be taking any trips to the shore while cooking.
- First thing when you wake up, take the brisket out of the fridge and put it on the counter, really cold meat on the smoker is no bueno
- Go fire up your smoker, place drip trays in the smoker and fill them up a good ways with apple juice. Use water if you want.
- Get the smoker up to 225F, make sure it holds that temperature for 30 minutes so you are sure it is dialed in. 225F is my max temperature, anything higher for sustained times is no good. Anything lower is fine, just means longer cooking times
- Put the brisket in the smoker, cap side up. Insert your thermometer probe in the thickest part and close the lid. Resist the urge to open the lid, every time you do, you let the heat out and add a good bit of cooking time.
- Keep checking your fire and maintaining the temperature.
Here’s where this adventure can take a fork in the road…. some people wrap, and some don’t. Doesn’t really matter much to me either way.
- If your smoker is not fancy, and you don’t mind maintaining the temperature throughout this process, than leave the brisket on there til the internal temp is 175F – wrap it tightly in foil and put it back in the warm smoker until the temp hits 185F. Or, you don’t have to wrap at all, and just take it off at 185F. At that point, it’s done and OK to take off the heat. Leave it on the counter for 20 minutes and don’t touch it. Carry-over will cause the temp to go up to about 190.
OR
- After about 8 hours, you’ve pretty much maxed out the smoke flavor that will be absorbed. You can take the brisket off the smoker, tightly wrap in foil, and stick it on your oven set at 220F until the temp hits 185F. At that point, it’s done and OK to take off the heat. Leave it on the counter for 20 minutes and don’t touch it. Carry-over will cause the temp to go up to about 190.

Method 2 - about 8 hours in the smoker and a few more to finish in the oven. Notice the juicy goodness
Arguments about either method? I’ve tried both. The second will guarantee some juicy finished product and save you some headache of stoking the fire. The bark may not be as crispy in the end, but it will still be delicious. I promise.
Burnt Ends

Here we have the cap sliced off, and it cut into chunks
Here’s where we get to make good use of the cap. Once the meat has rested, cut off the cap and then slice it up. Toss it liberally in some BBQ rub and a little sauce, throw it in a foil pocket or disposable foil pan, and put them back in the smoker for another hour or two. Guaranteed good eats.

Brisket Burnt Ends .... mmmmmmmmmmmmmmm
Slicing

Juicy Goodness saved... any ideas what to do with the drippings? I am all ears!
Slice the brisket across the grain, I like to cut it on the thicker side but do whatever you like. Don’t be upset if the meat is so tender that you cannot slice it thin without first letting it cool a little bit. Invite a bunch of friends over and eat it up !!

Check out the smoke ring - nothin' fugazi about it