Seth's House
DIY 12 Volt PID Smoker Controller
While my last PID controller build is extremely versatile and a multi-tasker, the only drawback is that it requires AC power to operate. I recently put together an Ugly Drum Smoker, which unlike my CharGriller, is (somewhat) portable. The need came up for me to build a PID + blower fan rig that could be powered from AC, but also portable power if necessary. Luckily for me, the JLD612 comes in a 12 volt model, and with a background in car electronics, this 12-volt setup was a cake walk. This particular build is not a multi-tasker, just a straight up smoker controller.
While at home, I can power it with a standard 12 volt wall wart power supply, and when on the go, I can use a jump pack, or even a car battery and some alligator clips.
Just like anything I post, this is the way *I* built this unit. Is it the only way to do it? Nope. Is it the absolute best? Probably not. But it works for me, and should give you, the reader, enough information to help you figure out something on your own.

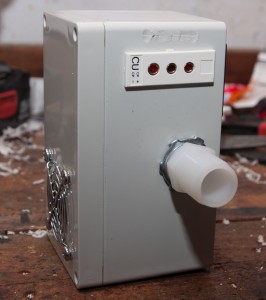
Completed unit
Parts List
Here are the parts I used for my build – many have “See Power Input Notes below” because you can pick and choose whatever type of physical input power connector you wish.. this is just what I ended up with myself. There are infinite choices, many better ones than I have used, you’re free to do what you wish.
- 1x JLD-612 (12 Volt Model) PID Temperature Controller – $36.50 US
- 1x Digikey P/N 603-1177-ND 15.3CFM 12V Blower Fan – $15.53 US
- 1x Digikey P/N HM923-ND Project Box – $15.13 US
- (See Power Input Notes below) 1x Digikey P/N T1061-P5P-ND 12volt Power Supply – Size M Connector- $14.70 US
- 1x PT100 Sensor Probe – $15.50 US
- 1x TPJ-U-F thermocouple panel jack – $4.70 US
- 1x OTP-U-M thermocouple male plug – $3.90 US
- (See Power Input Notes below) 1x Digikey P/N SC-1047-ND *OR* Radio Shack 274-1563 Size ‘M’ Panel Connector ~$4 US
- (See Power Input Notes Below) 1x DigiKey P/N 763KSW-ND *OR* Radio Shack 274-1569 Size ‘M’ DC Power Plug ~$4 US
- (See Power Input Notes Below) 1x 12 Volt SPST Switch (optional – have a look at Digikey’s catalog or a Radio Shack Example that I used) ~$4 US
- Standard Automotive 12 volt relay (something like this) – ~$5 US at any Auto Parts store, I had some laying around
- (Optional) 2x Barrier strips, at least 3 positions – like these – don’t forget the jumpers
- 1″ ID x 3/4″ MIP Nylon Hose Barb (Home Depot part A-625 in the nylon hose part area)
- Hose to connect to your smoker – I used 1″ ID plastic bilge hose from Home Depot
- (Optional) 1x Warning light, 12volt powered, if you plan on using the built in alarm functions of the JLD612
- 1x Fan guard, salvaged from parts laying around. Digikey’s fan guard section
- 1x Fuse holder Example 1 Example 2 – along with a 1amp 12 volt fuse
- M4 nuts and bolts to mount the fan
- Various quick disconnect crimp connectors. If you have a well stocked electrical connector box for automotive stuff, that will get you through it
- Hot glue gun to mount components like the barrier strips
- Dremel tool / drill, to mount everything in the box
Power Input Notes
I chose to use a wall wart for my 12 volt power source (when AC is available), and also put an on/off switch for the whole unit. You don’t need to use either, but you can if you want. I actually bought the wall wart, but, if you go digging in your junk pile at your residence, you will probably find a 12V power supply that works just fine for you from an old phone or router. You may also decide to use this away from any type of power source ever, and just use a 12 Volt battery or jump starting pack (my whole reason for building a 12 volt PID in the first place) – in that case, pick whatever type of physical power input plug works for you. Digikey and Radio Shack have extensive choices, have fun with their catalogs.
Relay Talk
The JLD612 has two different methods of activating the heating device, in our case, a blower fan. It can use the built-in relay J2, or it can use the built in SSR (solid state relay) control. Since I had relays laying around, my build uses the J2 option. If you want to use an SSR, by all means, go right ahead. Sample units are here and here. The advantage of using an SSR is that you could use the built in alarm functions of the JLD612 to activate warning lights (anything, really) on low or high temperature conditions, while using the SSR output for the PID control. In my setup, J2 is tied up with PID control, so only J1 is available for alarm output.
Fan Output – Rectangle in to a round hole?
When I first envisioned this thing, my only real question without having the parts in my hand was if the rectangular output of the fan would mate up to the circular hose barb – more importantly, if I would have to block off the air from the fan exit so that it would only blow out of the hose barb, and not just blow inside the project box. The answer is, no, I did not have to block off any of the fan exit. When I mounted everything, I lined it up as best I could, and plenty of air comes out of the barb without any sort of special ductwork. I am actually impressed at the amount of air that this fan moves.
Component Mounting
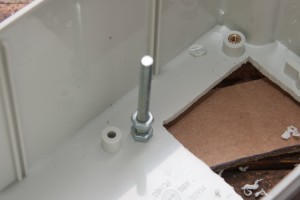
I mounted the JLD612 and thermocouple jack first. Make templates with cardboard for the JLD612 and thermocouple panel jack. Transfer these templates to the plastic project box and start cutting. My JLD612 is mounted high on the box as far as I can go, while still being able to attach the wire terminals for pins 6-10 on the JLD612, and leaves enough space for the fan to fit in the box.
Closeup of fan mounting post
Once the JLD612 is in place, I worked on mounting the hose barb, which is the fan output. I first placed the fan in the box and mounted it as high as I could without interfering with the JLD612, but also clearing the plastic ridge inside the box. I then marked its two mounting holes and drilled holes in the plastic box. Using a 2″ M4 machine screw, I secured the screw through the box, with a nut on the inside. I then added 1 nut to each screw, so the fan stood off of the box by about a 1/4″ (eyeballed). Once the fan was mounted, I marked the center location of the fan output, and drilled the hole for the hose barb. Mount the hose barb with the conduit nuts, then adjust the location of the fan so that it is centered in the host barb opening. Once it’s centered, add another nut to each screw to hold the fan securely.
Mounting hole for JLD612. Posts for the fan, and barb mounted.
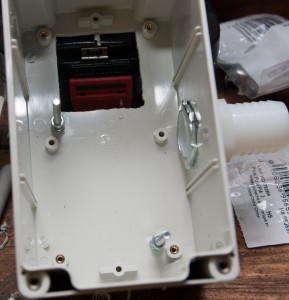
The switch, warning light, and power input jack all mount through drilled holes. The relay inside mounts on one of the fan screw posts with a nut, just so it’s not bouncing around.
Wiring
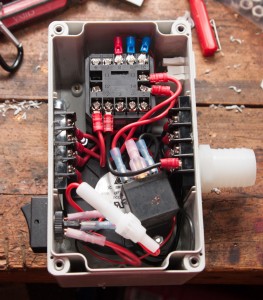
- Input voltage comes in through the M connector. Negative (aka ground in the 12V world) goes straight to the Negative Barrier Strip. +12v goes through the switch, to the fuse holder, then to the +12V Barrier Strip.
- Supply +12V from barrier strip to the JLD612 on pins 1, 4*, 13, and the relay pin 30
- Supply -12V from barrier strip to the JLD612 pin 2, Relay pin 85, fan negative, warning light negative*, and your switch if you chose a lighted one
- Connect the red pin of your thermocouple to pin 8 of the JLD612 (through panel jack)
- Connect each blue pin of your thermocouple to pin 9 and 10 of the JLD612 (through panel jack)
- Connect pin 14 of the JLD612 to pin 86 of the relay
- Connect pin 87 of the relay to the fan positive input
- Connect pin 5 of the JLD612 to your warning light +12v*
*Warning light not pictured at the time of writing this
Everything mounted and wired
That’s about it as far as construction goes! You will want to familiarize yourself with the PID controller manual and set all of the configuration parameters properly on the first use. My settings are as follows on the ‘0089’ set menu:
- IntY = PT 10 0 (Pt100 thermocouple, this setting will show temp in .1 increments)
- OutY = 1 (PID controls J2 )
- rd = 0 (heating control)
- CorF = 1 (Fahrenheit)
On the ‘0001’ set menu, I have the following settings, for the high temperature warning light to come on at 230F and go out at 228F:
- AH1 = 230
- AL1 = 228
On the ‘0036’ set menu, I have the following setting due to me using a mechanical relay. For an SSR, leave this alone:
- ot = 5 (Recommended to use 5-15, TBD what setting I end up with. This keeps the relay from cycling so much and wearing out)

Maiden voyage, on the UDS
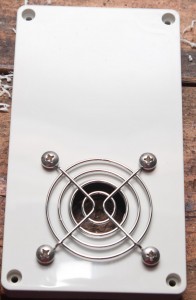
Fan finger screen
Side view, thermocouple plug and hose barb. Don’t mind my dremel oops.
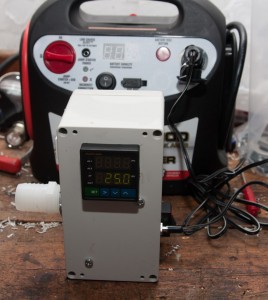
Tested the controller out with a cigarette lighter plug.. works great off a jump pack

DIY PID Control for BBQ, Sous Vide, Mash Tun, whatever….

My DIY PID Controller for BBQ, Sous Vide, Home Brew
(update: go HERE for a 12 volt BBQ controller!)
I’ve been slacking on the blog, I know, been busy!
Here’s a project that’s been in the works for a while, and I wanted to test it out to make sure it works well before sharing with everyone.. well, here it is! A DIY PID controller for a smoker, sous vide cooking, mash tun, whatever you can think of, that doesn’t break the bank. After a few runs in the smoker and sous vide (a la crockpot), I can say, it’s awesome !!!!
What is PID? Basically you tell it what temperature you want something, and it figures out how to hold that temperature. It’s nerdy and involves lots of math. I can’t explain it too well, so go and read about it here.

PID Controller, Sous Vide style, powering a crockpot
When I set out to build this, I wanted to keep costs down (obviously), but I wanted it to be versatile, so I decided to build everything with modular plugs, so that thermocouples and outputs could be swapped in a matter of seconds. Everything fits into a project box, and all you do is plug in power (input), a thermocouple (thermometer for you noobs), and then plug in an output device, whether it is a blower fan, a crock pot, a heating element, whatever. All of the components in my design are good for 15 amps, so a ~1500 watt heating element should be no issue. Wiring is simple and contained completely within the project box. I chose to do a simple design for the first incarnation of this device, but I have some ideas for another one. The PID controller has alarm outputs (such as over/under temperature) that could potentially control other items, such as a damper to release extra heat in the smoker, outputs to my X10 devices to page me, etc… the possibilities are endless.
Parts List
- 1x JLD612 PID Controller – $33.50 US
- 1x Submersible thermocouple – $19.50 US – this is for Sous Vide only
- 1x PT100 thermocouple – $16.50 US – this is mounted in my smoker
- 1x ESSR-25DAC 25amp DC in / AC Out Solid State Relay (SSR)- $8.95 US
- 1x EHS-SSR25A heat sink for the SSR – $4.25 US
- 1x TPJ-U-F thermocouple panel jack – $4.50 US
- 2x OTP-U-M thermocouple male plug – $3.50 US each (only need one per thermocouple
- 1x 486-1083-ND – female NEMA-15 outlet (output outlet) – $1.42 US
- 1x CCM1909-ND – power entry module w/ switch (input) – $7.66 US (you can go with a more simple input plug without a switch, but I wanted a switch on mine, and these fit your standard computer power wires)
- 1x HM928-ND project box – $17.82 US – Digikey’s site is very easy to search, if you need a bigger box, then look around – just make sure the dimensions are deep enough for all of your components.
- 1x 1053-1118-ND 14CFM blower fan – you can go bigger or smaller, this one seems to work great on my Chargriller
- 2x Barrier strips, at least 3 positions – like these – don’t forget the jumpers
- 1x stainless steel pet water bowl, to mount the fan to the BBQ – see picture. Found it at Walmart for a few bucks
- Various M4 screws, to mount SSR heatsink to the SSR. Take them both with you to Lowe’s/Home Depot and figure it out
- Heat sink paste for the SSR
- Various quick disconnect crimp connectors. If you have a well stocked electrical connector box for automotive stuff, that will get you through it
- Hot glue gun to mount components like the barrier strips
- Dremel tool / drill, to mount everything in the box
Wiring
Wiring is pretty easy – you can see most of it in the picture. Use at least 14ga on the 120volt stuff. The DC is low current, but I still used 16gauge because that’s what I had around. Thermocouple wiring comes with the thermocouples, I just changed the connectors. Specific wiring info:
- For 120v – the hot side of the input module goes through the switch and feeds a barrier strip. One barrier strip output goes to the output side of the SSR, the other output goes to the PID controller on pin #1. SSR Output goes to the output module hot.
- The neutral side of the input module feeds a barrier strip. One barrier strip output goes to the neutral of the output module, the other goes to the PID controller on pin #2.
- The ground wire goes directly from the input module ground, to the output module ground.
- The thermocouple panel has one plug that is larger – I used that for the red. Connect that to pin #8 on the PID. Connect the two blues to pins #9 and #10
- Connect Pin #6 of the PID to the + Input of the SSR
- Connect Pin #7 of the PID to the – Input of the SSR

PID Controller, wired up in the project box
Component Mounting
Mounting components was simple. The input module, output module, PID controller, and thermocouple plug all require some dremel work to make mounting holes, then they snap into place. I used some hot glue for added security. My input is on the right in the picture above, the output and thermocouple is on the left.
The heatsink mounts to the project box with screws, those are the 2 screws that you see on the first picture of this post that show through the front. I did not want to use glue for this part, as this part gets hot, I don’t need it coming loose inside.
When mounting the Thermocouple in your smoker, you want it as close to the cooking surface as possible, and also nearest to any potential hotspot. Remember, with smoking, high temperature is bad and will ruin food, low temperature only extends cooking times. On my Chargriller Smokin’ Pro, this meant the thermocouple was mounted about an inch off of the cooking surface, on the right side of the cooking area, nearest to the side fire box. My smoker can vary temperatures up to 15 degrees from side to side.
That’s about it as far as construction goes! You will want to familiarize yourself with the PID controller manual and set all of the configuration parameters properly on the first use. My settings are:
- IntY = PT 10 0 (Pt100 thermocouple, this setting will show temp in .1 increments)
- OutY = 2 (PID controls SSR )
- rd = 0 (heating control)
- CorF = 1 (Fahrenheit)

Blower fan, mounted on the side firebox of a Chargriller Smokin’ Pro

Here’s a brisket that was done using this controller

Teriyaki Chicken Breast, Sous vide
Some more pictures of the box:

Another wiring view

Thermocouple port and output port

Input module, accepts standard computer power supply plug

Thermocouple mounted on the smoker (since moved to the other side)
Processing, Take 1: Pesto
Thanks to a Kohl’s 30% off coupon, and a big sale, I picked myself up a nice Cuisinart Food Processor. I was going to pick up a stand mixer but I first consulted Lee and we figured it would be better to loan each other big ticket kitchen items like this, instead of buying each for ourselves. Makes sense to me.

Cuisinart Food Processor
I had an extra ridiculous amount of Basil due to a restaurant supply addiction, and an itch to use the food processor, so it is Pesto time. Pesto is a simple, fresh tasting spread or sauce, and has countless uses. It’s SO easy to make and have ready fresh for a meal.

Pesto ingredients before processing
Ingredients
- 4 cups fresh basil leaves, packed
- 1 cup grated parmesan (romano will do)
- 1 cup extra virgin olive oil
- 2/3rds cup pine nuts (apparently you can substitute walnuts, I will next time – pine nuts are EXPENSIVE!)
- 6 cloves minced garlic
Preparation
- If your pine nuts and garlic are not chopped, toss them in the food processor and give it a few pulses to chop them
- Add the basil and garlic, and turn the processor on. Slowly add the olive oil through the feed tube until it is all in there, stopping when necessary to scrape the sides of the processor. You want to make a puree so keep going until you get there.
- When it’s done, add the cheese and pulse a few times
Makes: 2 cups, eh, maybe a little more than that. Nothing is exact with my cooking, you should know that by now.

Press some buttons and pour in oil, voila, pesto
Storage
Air is the enemy of Pesto. Leave it out and watch it turn funny colors in a few minutes. If you are going to freeze it, some say to leave out the cheese, but I didn’t do that and it’s fine. What I did do though, was pipe it into ice cube trays and covered closely with plastic wrap. When frozen, I transferred to my trusty vacuum sealed bags and they will be in the freezer until called upon.

Piped into ice cube tray and ready for the freezer (don't forget to cover with plastic wrap)
Now that you have all this Pesto, what are you going to use it for? I highly recommend using it minutes before you are ready to eat it, here are some thoughts that come to my mind
- Pesto spread on some nice crusty Italian bread
- Pesto on some DIY pizza
- Pesto on pasta… that’s an easy one
- Marinade for Chicken
- the list goes on…
Homemade Flash Battery Packs

Battery packs, charging up. 2 of them with case off so you can see the guts
Quantum did have a product that I knew I wanted though – their battery cables. I kept my eyes on ebay and after a month I collected 4 Quantum flash cables for the Vivitar 285HV’s I use, and the Canon 430EX. Retail price is over $50, I didn’t pay more than $20 a cable shipped.
4 AA batteries = 6 volts, so I went on the prowl for some big 6 volt batteries. Luckily for me, there is a Batteries Plus store down the street and they had quite a big selection of 6V batteries. I found waterproof plastic project enclosures and brought them with, and grabbed the battery that fit the best and also was rated high enough for my liking.
For connections, I went over to the shack and grabbed some 4-pin plugs that also had screw locks so they wouldn’t disconnect unexpectedly on me. Finishing up the enclosures was a fused link and a power switch.

The guts of the boxes
To charge these, I picked up 2 six-volt battery tenders and modified the packaged cable to charge 2 batteries at a time in parallel. When they are not in the case, they sit on the charger at home, maintaining a charge.
Impressions? After 2 years of abuse, these things are still kicking. No problems whatsoever, except for minor user problems like forgetting to plug the chargers in once! The only time I actually killed a battery was at a two day race, I had at least 1000 full power pops on the 285HV’s before having to change to the next set.
Total cost? About $200 for four battery packs + cables. Not bad considering I’d spend the same for ONE retail or Al Jacobs battery pack. Don’t get me wrong, those products are awesome, but I’m a DIY’er at heart.

The Quantum cable, with my end on it
Parts List (links to examples, where I can)
- Waterproof electronic project box – search any major electronics store or Google for one
- Werker WKA6-5F 6 volt 5Ah sealed battery
- 4Pin Jack, need male for box side and female for cable side
- On/Off switch
- Fuse Holder
- Quantum Battery cables … ebay is your friend for this one. You’ll want the Quantum MA2 for the Vivitar 285HV’s
- 2 beers while you solder stuff up
- 6 volt Battery Tenders, you can charge 2 batteries in paralell with each
Who likes Free Stuff? I do.

One of the Body Wash receipts (bought $8 worth of other stuff)
Let me preface this post first by enlightening everyone to a term I have… more like a group of people I turn to when I need information. Nerds on the Internet. There are all kinds of Nerds on the Internet. A lot of them influenced some of my other posts that you will see soon regarding photography, food, the general DIY world.
The particular Nerds I will touch upon today are the coupon nerds. Sitting on the couch at some odd hour of the night inflicted with one of my respiratory infections this winter, I saw a show called Extreme Couponing. These people are psychos – they take their grocery bills down hundreds of dollars by timing deals and using coupons. The word extreme does not even begin to describe some of these folks. It did however, spark my interest. Let’s admit it – times are tough, if you can save money, why not? I know, I’ll probably get flamed for this post, but you know what, I’m saving cash money in my pocket so flame away.
I started to read around what the Nerds were up to, with the goal of seeing if I could save some cash on things I know I would buy and use anyways.
(WARNING – NERD ALERT) There are forums where the masses gather to discuss good deals at stores, and how to combine those deals with coupons to get things for very cheap or free – the site I have been reading is called A Full Cup (AFC for short). Once you sift through all the crazy ladies, funny acronyms, and the extremists, there are some good deals to be had with coupons. Each store will have a thread each week when the ads are released, that explain what you can find free / cheap / good deal in the upcoming week, and what coupon to use along with it to get a better deal. All it takes is about 20 minutes of reading around Tuesday or Wednesday (when the ads come out), and you never know, you might see something free / cheap that you can stock up on, or a good deal on something you were going to buy anyways.
I’m not awake enough early to get the Sunday paper, nor do I feel like clipping coupons, so I found that you can actually pay for someone else to clip coupons and mail them to you. I’ve used the Coupon Clippers a few times so far, there are others, just google it. At first I thought paying for coupons was insane, until I realized, I’m gonna buy the stuff anyways, if I shell out 15 cents I can save a dollar – why not. You end up in the black at least 1000% by going this route in the end. Also, you can get dozens of coupons if you plan on stocking up. Some of the deals require you to get the shopper’s card at the store, no big deal. A lot of coupons are also printable from the Internet – most limit 2 per computer, so if you have more than one computer, print away.

Body Wash... yep free
Since I’ve been reading this stuff, some deals I took advantage of just to prove a point:
- Contact solution. I paid $2 for 10 $4 off coupons of the contact solution I use. It’s normally $15 at Target, it went on sale for $9 something, with $4 coupon, I got it for $5 a box. $50 for 10 packs after spending 2 bucks, beats full retail of $150 in my book any day. So I took advantage, stocked up, now I’m set for quite a long time and none expire any time soon
- Body wash and deodorant. I paid $5 for 20 buy one, get one free coupons for body wash or deodorant. It’s on sale buy one, get one free at Walgreens this week. It just so happens that you can use these coupons along with a store sale, to get things absolutely free. Voila, I have a pile of body wash that I paid 25 cents a bottle for, instead of $5
- Tabasco sauce. $3 for some small mountain of 75 cents off Tabasco sauce coupons. Wegmans has it on sale for 99 cents, or regular price of $1.39. They double 75 cent coupons to 1.50, so they actually paid me to take Tabasco sauce. I have a small mountain of it, check the picture. I go through this stuff like it’s my job since I douse all of the bland diet frozen dinners I eat with it.
- Laundry soap. Wegmans has the laundry soap I’ve been using for $2 a bottle. Paid 60 cents for $1 off 2 bottles. $1.50 a bottle, have enough for probably another year.
- Dryer sheets and fabric softener. Paid $5 for 20 $3 off Gain coupons. They are $3.26 at Walmart. 26 cents for dryer sheets and fabric softener? Ok.
- Snacks. This one takes the cake. The Nerds had a post that certain snacks you buy at Rite-Aid in the month of February give you a $1 coupon for each one you buy, off your next purchase. These snacks went on sale for 4 days at the end of the month for $1. So, you go in, get 10 snacks, it prints off 10 $1 coupons off your next purchase. Well, you go right back in, or to another store, get 10 more, pay with the coupons, and it printed off 10 more $1. Free money. I now have a small mountain of snacks for the summer time, that I’ll be able to stock up my friends at the drag strip with. All it cost me was an hour and a half of my afternoon.
- Toothpaste and toothbrushes. I have 20 something packs of each, because of coupon doubling, Wegmans paid me to take from them

See the Tabasco and Mustard? Yeah, that was free.
I’m sticking to my goal, getting deals on things I know I’ll buy anyways, or can use. If I can’t use it, I’ll be giving it away to charity, so either way, someone is making out good. Some of this stuff I’m going to pass on the deals, I don’t need a 40 year supply of laundry and dish soap.
Any problems so far? Nope. Most cashiers are actually pretty impressed at how much you can knock off a grocery bill. Others are not too surprised as I’m not the only one around here that’s psycho and reads AFC, so they are used to people coming in and grabbing a lot of one item and just so happen to have a pile of coupons.
Do what I did, have a read, see if you can save on everyday stuff you’ll buy anyways. Put the cash towards more important things, like beer and vacation.